
Snowflakes

Another shot of the snowflakes attached to the house

6809 development system (top) I made the PIA interface board

1 watt bulbs at 7 volts each, wired in series. Needed 4x15 volt transformers

Connection box for 48 wires This was an outside interface

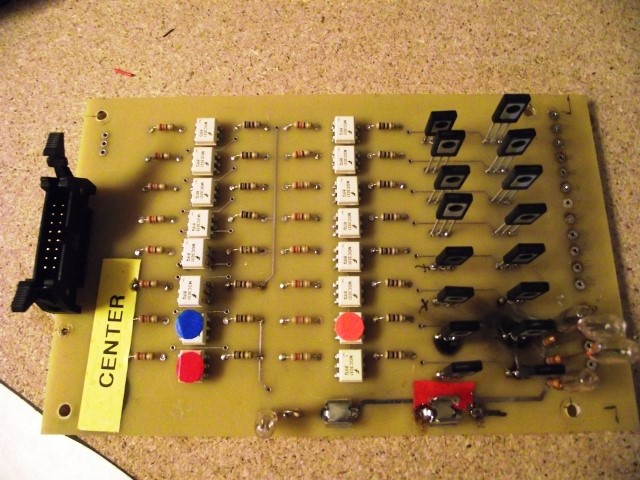
48 channel triac driver board

(Left) This is what I had in 2009/2010. I modified it by replacing the 6809 development kit and PIA board with a PIC MCU (Right)

| Year | Bulb type | Computer | Program Language | Interface |
| 1983 | 1 watt incandescent | Motorola 6809 kit | Assembly | 48 channel triac, PIA |
| 1997 | 5 watt incandescent |
Motorola 6809 kit
|
Assembly |
48 channel triac, PIA
|
| 2009 | 5 watt incandescent | Motorola 6809 kit | Assembly | 3x16 channel triac boards |
| 2011 | 5 watt incandescent | Custom PIC MCU | PICBasicPro |
3x16 channel triac boards
|
| 2012 | 7 watt incandescent | Custom PIC MCU | PICBasicPro | 3x16 channel triac boards |
| 2019 | 3 watt RGB LED | Arduino UNO | C++ | 8x16 channel driver boards using I2C |
In 2019 I switched from incandescent to LED (3W non-addressable)
One of three new triac boards to replace the 48 channel
Easier to troubleshoot, not all 3 snowflakes on one board
Easier to troubleshoot, not all 3 snowflakes on one board
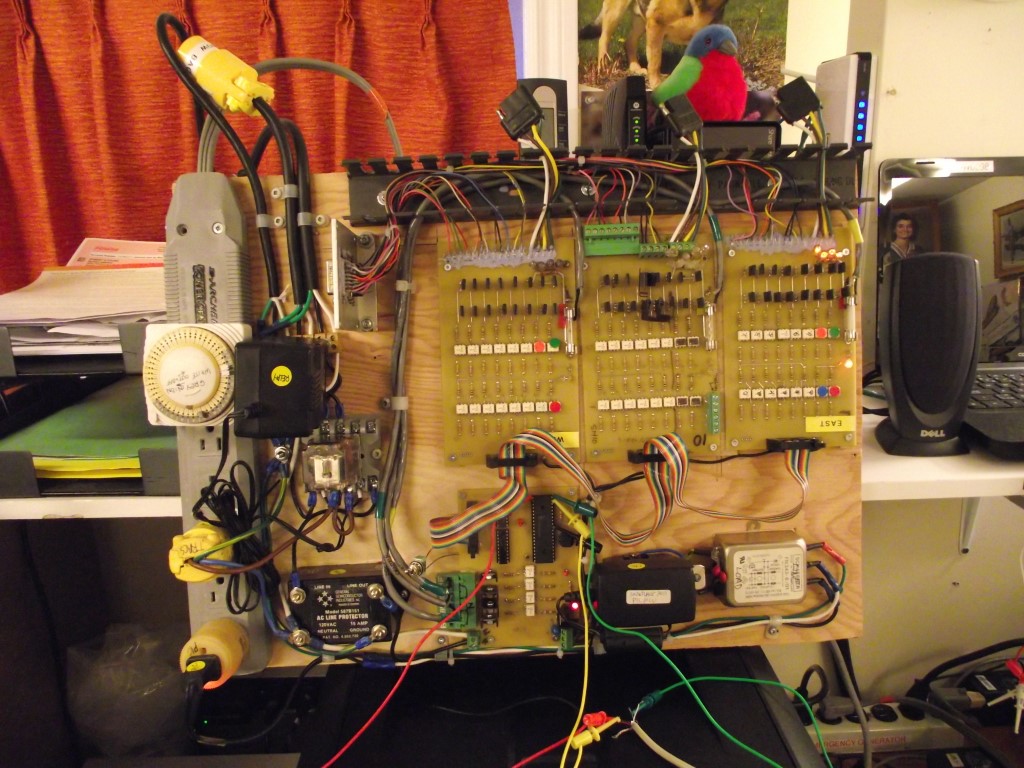
Last version of AC incandescent snowflake control. Three triac boards (16 channel) shown with wires to the snowflakes exiting top and left. MCU at the bottom center. Two Black wall-warts shown, black gizmo with 4 posts is an AC filter, as is the chrome blob at far right. Timer to start the whole thing is mounted on the power bar.
2019


")


 connects them all togehter")
")


Snowflake C++ code for Arduino (click)
Wednesday, August 14, 2019
This was my second display, built in 1983, but has been changed three or 4 times since then and was last run in 2017. A new version using LEDs will be ready for 2019 season..Highlights are not links, only significant contribution to this model of Snowflake
Send Comments
1983
(A VERY early design used 48 relays! Boy was that noisy, and drew a lot of power. What a stupid idea that was!)
Wednesday, August 14, 2019
128 lights were wired in a parallel-matrix arrangement in the shape of a octagonal snowflake (yeah I know, snowflakes are hex). The original configuration used 1 watt incandescent light bulbs with two lights on each snowflake "arm" wired in series. I used six 15 volt transformers, two for each of the 3 snowflakes. Lots of current was flowing through the system so the transformers were pretty big. The interface between the computer and the lights was a 48-channel digital triac board. Having learned from my first triac board design, I was able to squeeze 48 channels onto a 9" by 11" printed circuit board. (A VERY early design used 48 relays! Boy was that noisy, and drew a lot of power. What a stupid idea that was!)
1997
Since the snowflakes, which were 4 feet in diameter, were outside and the control was inside, I made a small simulator out of 150 neon bulbs that mimic the patterns on the lights outside. This made it easier to troubleshoot and program using a Motorola 6809 development kit for the computer. The code was written in assembly language, burned into EPROM that resided in the development board memory space, and output values were sent off the board to an interface board that I built. This board had 3 PIAs (peripheral interface adaptor) and bus line-drivers on it that drove the triac board.
Wednesday, August 14, 2019
Over the years I would "spiff" the display up a bit with tinsel and better bulbs to make it look not so plain. I redesigned the wood supports so they looked more like what a snowflake was expected to look like, using clip-art from Corel Draw as my model. I replaced all the 1 watt bulbs which were series-connected and put in premium 5 watt bulbs instead, and wired them in parallel. Since they were 110 volt lights, I was able to get rid of the transformers and cut the current demands down drastically. I used the same 48 channel triac interface board. The triacs ran cooler than they did before when I had the lower voltage, but higher current.Since the snowflakes, which were 4 feet in diameter, were outside and the control was inside, I made a small simulator out of 150 neon bulbs that mimic the patterns on the lights outside. This made it easier to troubleshoot and program using a Motorola 6809 development kit for the computer. The code was written in assembly language, burned into EPROM that resided in the development board memory space, and output values were sent off the board to an interface board that I built. This board had 3 PIAs (peripheral interface adaptor) and bus line-drivers on it that drove the triac board.
2009
Wednesday, August 14, 2019
About 20 different patterns were shown on the display with the cycle repeating every 5 minutes. In 2009 I replaced the 48 channel triac board with 3x16 channel triac boards to make it easier to troubleshoot and replace if necessary.
2011
Wednesday, August 14, 2019
I replaced the Motorola development board with a PIC 16F887 MCU on a PCB I made just for this application. I no longer use assembler, instead I programmed similar codes using an updated version of BASIC called PIC BasicPro. There are now 42 different patterns.
2012
Wednesday, August 14, 2019
was when I increased the bulb size to 7W (C9) and made the snowflakes 7 feet tall (instead of 4 feet) so they could be seen better from 700 feet, across our cove.Wednesday, August 14, 2019
I decided to replace the incandescent 110VAC system with 3W LEDs. (Hover over photo for description). I decided to only make ONE snowflake, instead of three as I had previous years (1000+ solder joints for one snowflake...) Instead of running BASIC in PIC MCU, I moved to Arduino and C++See Star Project