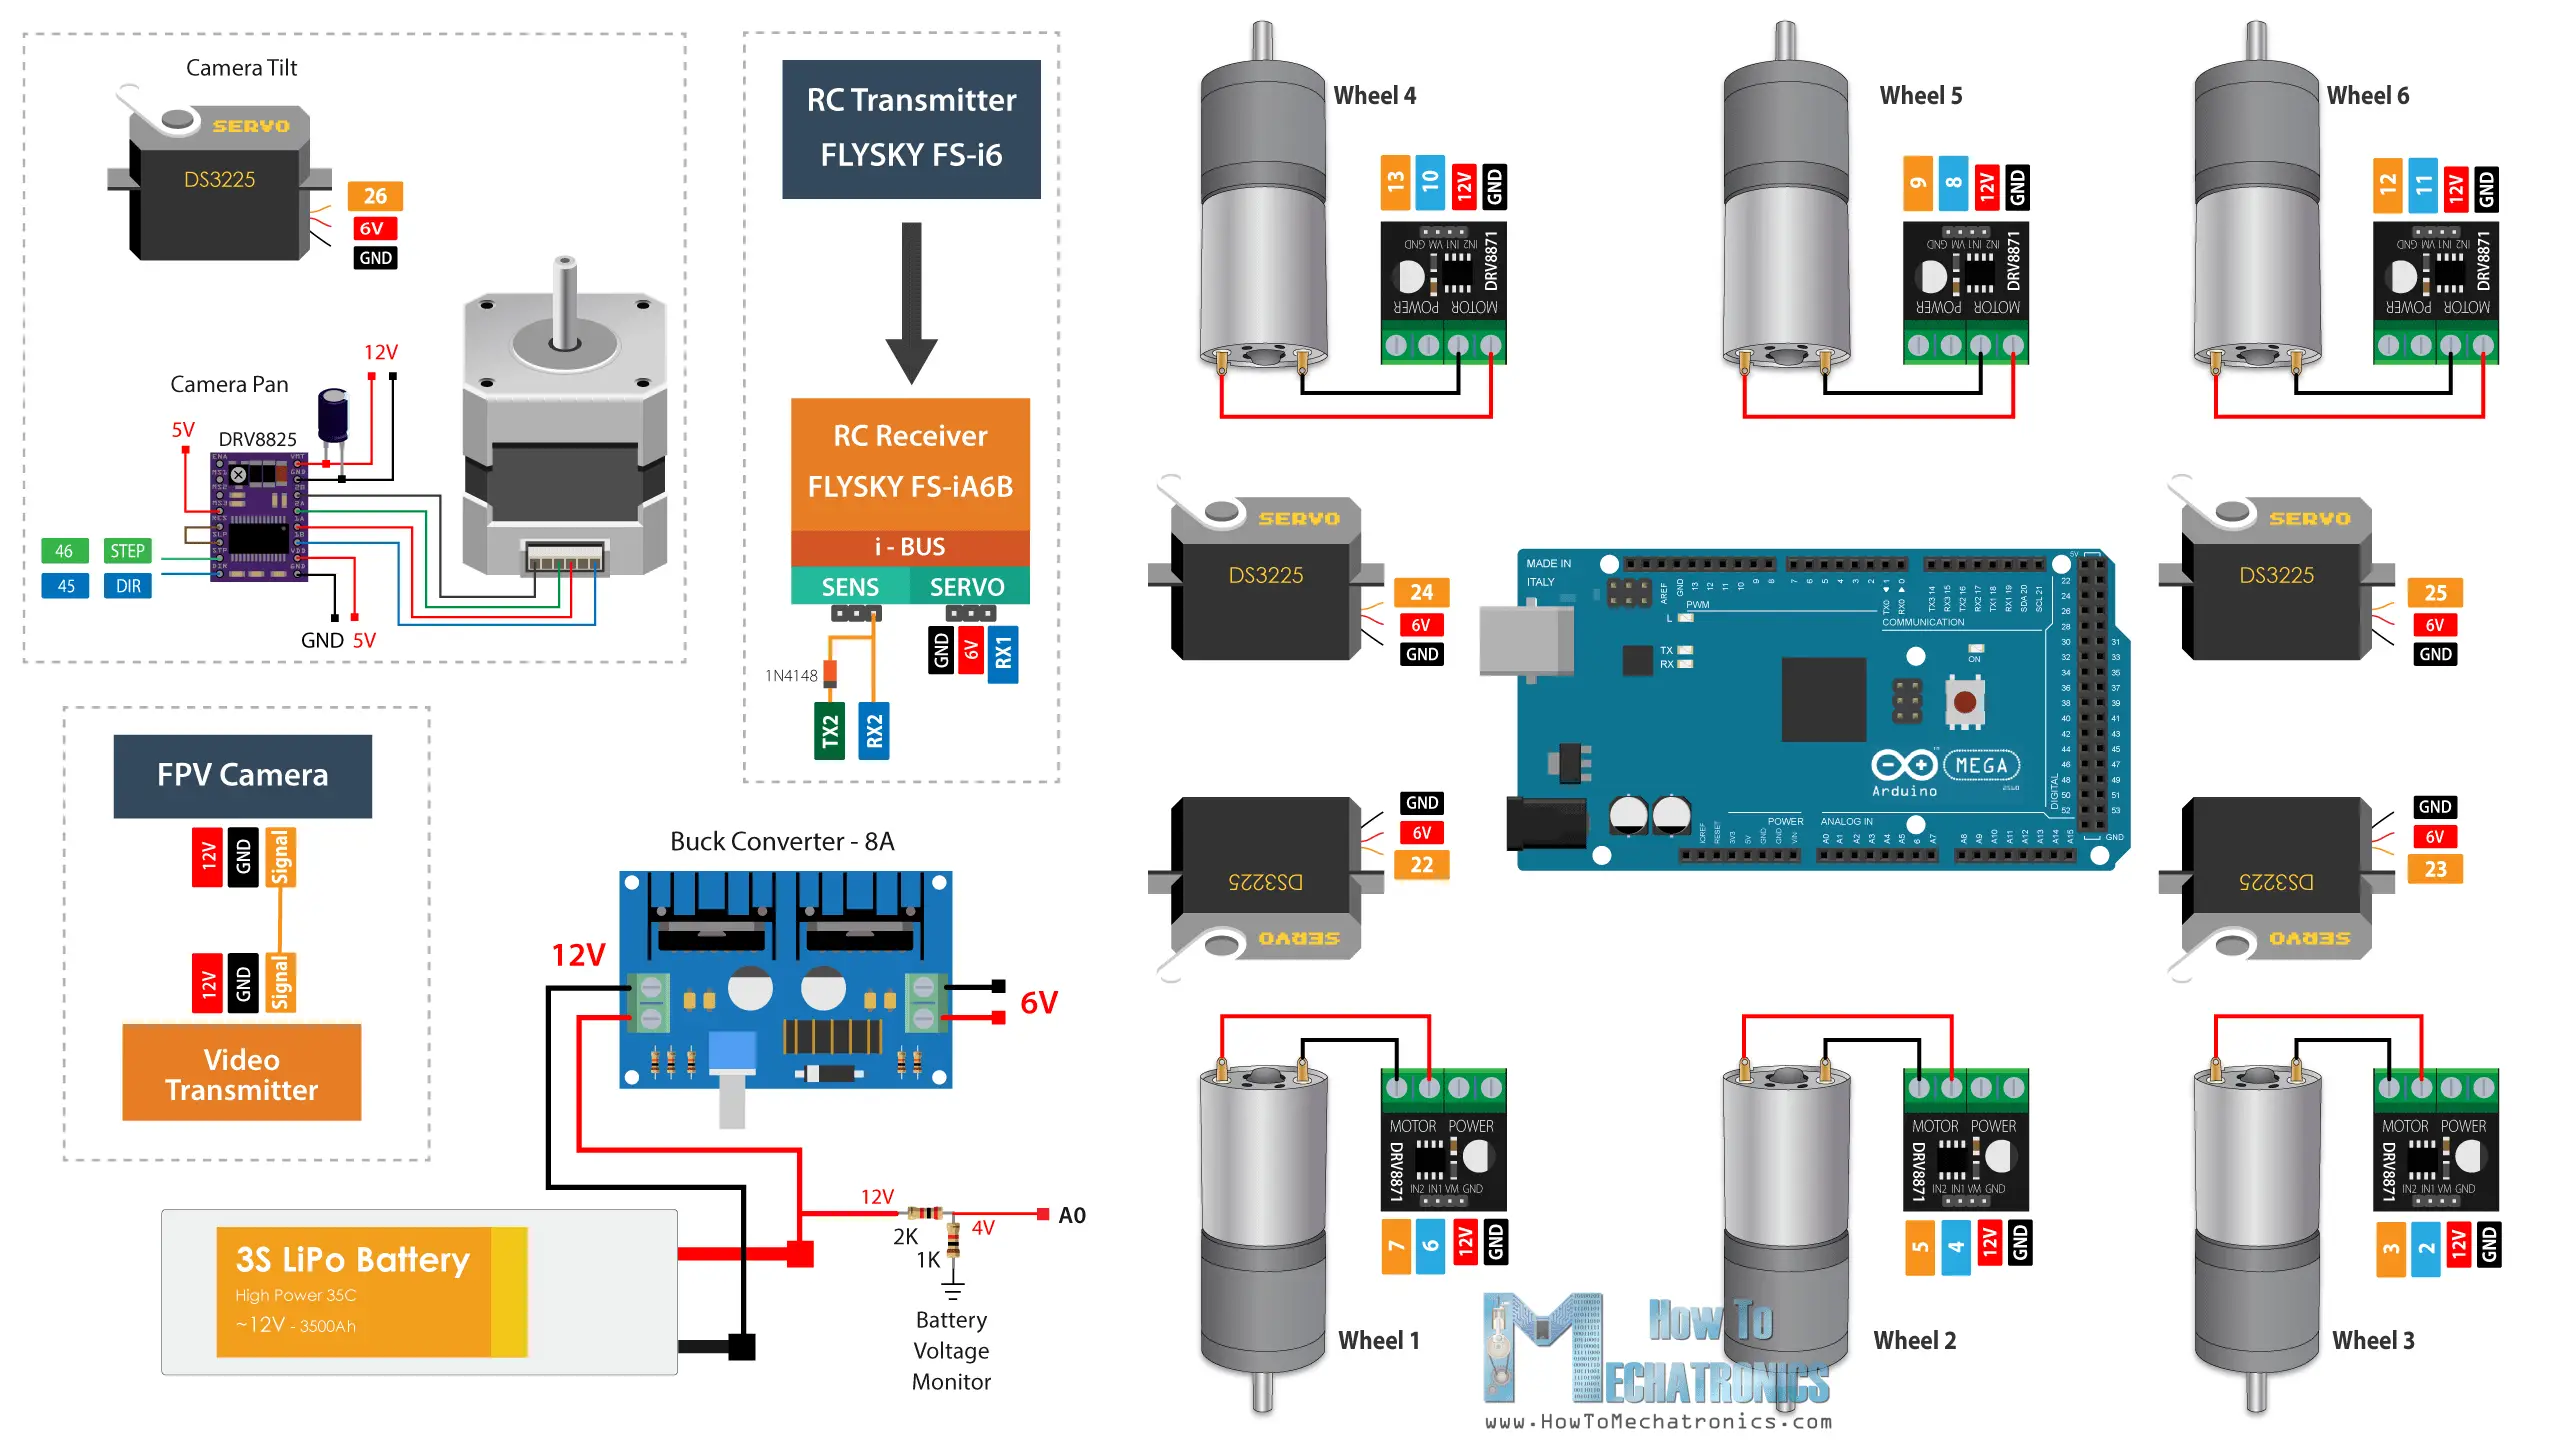


This is the schematic from the Mechatronics webpage
This is the PCB, using a Gerber viewer to display it. You should print a copy of this for reference when you are populating the board. The Gerber files you need to print your own board, are available from the Mechatonics website. Upload the Gerber zip file to PCBWay or JLCPCB to get the boards manufactured.
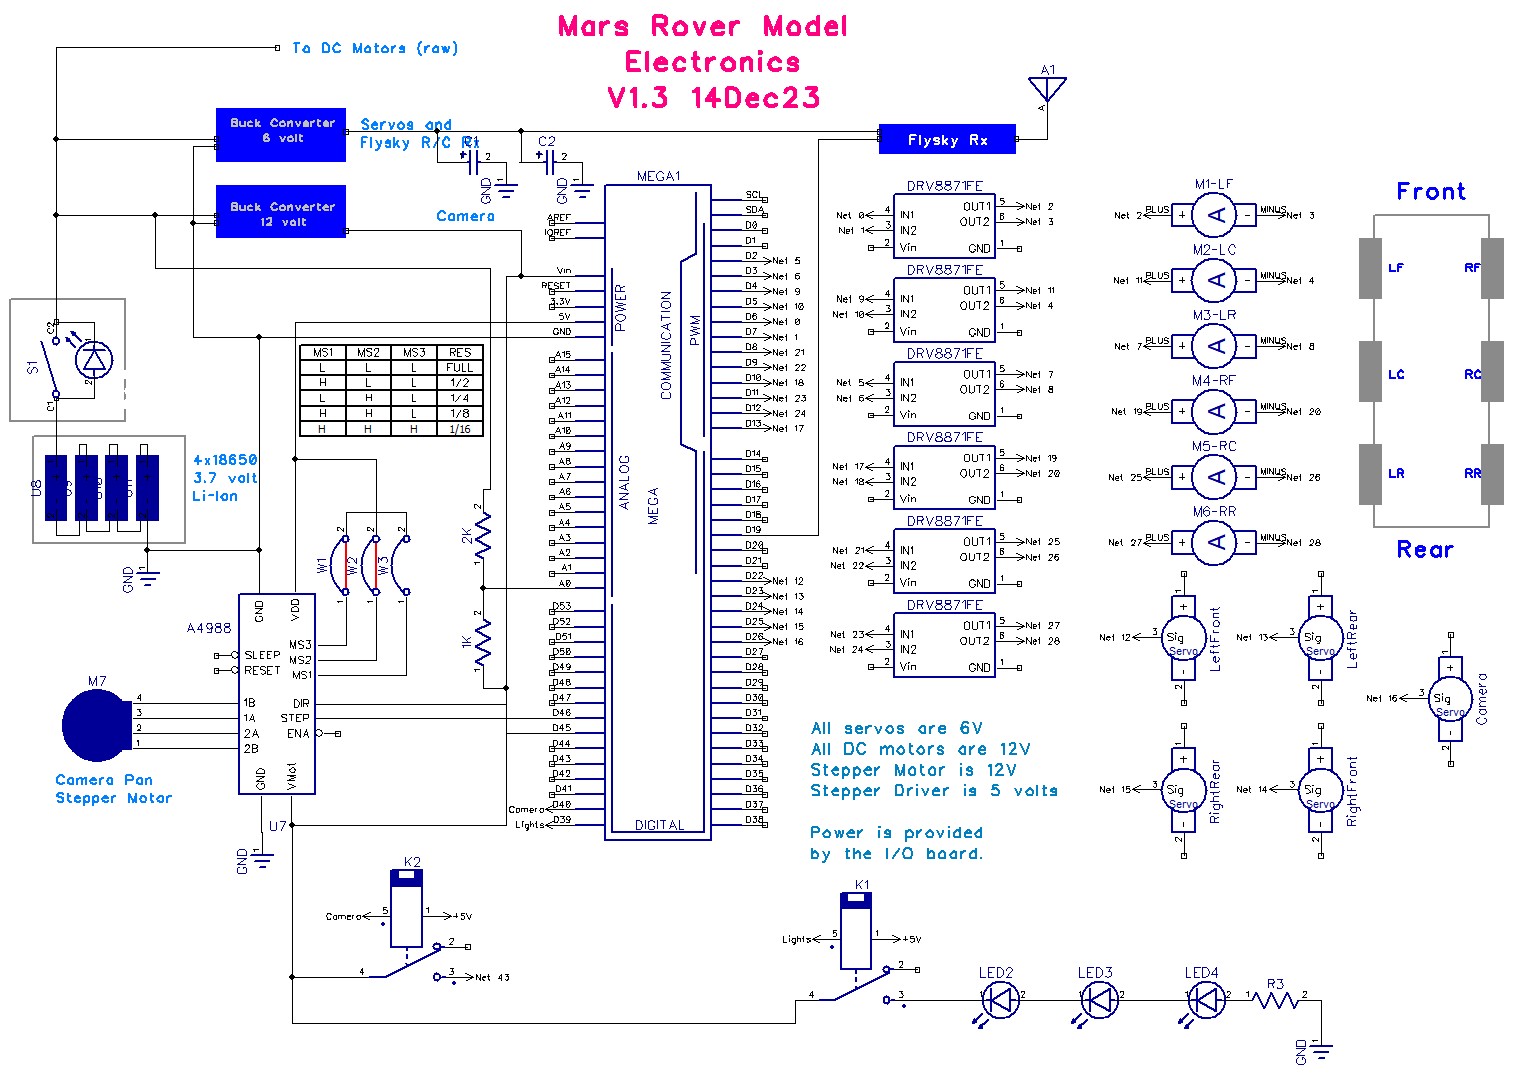
I made this schematic of my system AFTER I had everything wired up. Since then I added a battery management board for the 4 Li-Ion batteries
Electronics
My extra panels allow me to expand somewhat on the electronics, e.g. holding a relay that controls lights and camera. They also keep extra wires from sagging below the belly of the craft.
2. I needed/wanted an on/off switch so I mounted one on the left side panel on the back. It looks rather "natural" there, like it was meant to be. This controls power from the batteries and is the main shutoff.
3. I used four 18650 Li-ion batteries that I obtained from old "defective" laptop battery packs. The batteries have a very large energy capacity,with each supplying a nominal voltage of 3.7 volts. Fully charged the voltage is 4.0 volts each for a total of 16 volts, hence the reason for the 12 volt regulator module. The 12 volts feeds the Mega that converts 12 to 5 volts and 3.3 volts.
4. I made a battery level indicator which uses 10 LEDs,and an LM3914 integrated circuit. It all fits in a small box I made with the 3D printer. My prototype was made on Veroboard but I have since designed a PCB for it because I expect to use the indicator in other projects.
5. The PCB Mechatronics created is a work of art! It fits on top of an Arduino Mega like a "shield" so the entire brain of the unit is very compact. Too compact in fact, because it is a little difficult to wire and to read the pin numbers on the board when the package is in the electronics bay. My version of this would probably still use the Mega because of all the I/O available, but the daughter board would be larger and all 6 motor driver boards would be oriented the same way, instead of half upside down. It all works but is very tight and a little confusing when wiring these modules.
6. I added a battery management module for the four 18650 batteries to charge them equally.
Tuesday, December 26, 2023
1. Installing the electronics, wires, motors and servos is rather easy but there is limited space in the electronics bay. Mechatronics only printed two panels inside the bay, which is enough to hold all the electronic parts, but it is tight. I elected to print two more panels, one on either end of the one provided. (The one provided came as 2 pieces, that had to be screwed together, but my extra ones went all the way across as one piece.)My extra panels allow me to expand somewhat on the electronics, e.g. holding a relay that controls lights and camera. They also keep extra wires from sagging below the belly of the craft.
2. I needed/wanted an on/off switch so I mounted one on the left side panel on the back. It looks rather "natural" there, like it was meant to be. This controls power from the batteries and is the main shutoff.
3. I used four 18650 Li-ion batteries that I obtained from old "defective" laptop battery packs. The batteries have a very large energy capacity,with each supplying a nominal voltage of 3.7 volts. Fully charged the voltage is 4.0 volts each for a total of 16 volts, hence the reason for the 12 volt regulator module. The 12 volts feeds the Mega that converts 12 to 5 volts and 3.3 volts.
4. I made a battery level indicator which uses 10 LEDs,and an LM3914 integrated circuit. It all fits in a small box I made with the 3D printer. My prototype was made on Veroboard but I have since designed a PCB for it because I expect to use the indicator in other projects.
5. The PCB Mechatronics created is a work of art! It fits on top of an Arduino Mega like a "shield" so the entire brain of the unit is very compact. Too compact in fact, because it is a little difficult to wire and to read the pin numbers on the board when the package is in the electronics bay. My version of this would probably still use the Mega because of all the I/O available, but the daughter board would be larger and all 6 motor driver boards would be oriented the same way, instead of half upside down. It all works but is very tight and a little confusing when wiring these modules.
6. I added a battery management module for the four 18650 batteries to charge them equally.
Send Comments

")


Copyright 2024 Queenidog - All Rights Reserved